BAY CITY, Mich. - During the heat of the summer– especially the heat we've been experiencing lately– it is extremely important that oil condition and levels are checked on a regular basis. No one wants to be stranded on the side of the road in this heat. Here is a step-by-step guide on checking your oil, and some tips about how to know if your oil does indeed need to be changed.
Step 1: Your vehicle's owner's manual tells you when the fluids must be checked, however, this is just the minimum to keep your warranty in effect.
Step 2: Park your car on a level surface and set the parking brake. Make sure that your vehicle sits with the engine off for AT LEAST ten minutes before proceeding to check your oil.
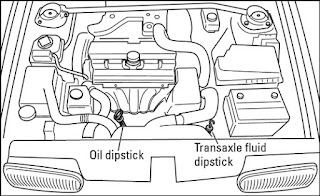
Step 3: Open the hood and locate the oil dipstick. The location of the dipstick depends on the type of vehicle you drive. If your vehicle is a rear-wheel drive, the dipstick is located below the Transmission fluid dipstick, as shown here:
However if you drive a vehicle with a front-wheel drive, your oil dipstick will be located here:
Step 4: Pull out the dipstick and wipe it off with a clean, lint-free rag or cloth.
Step 5: Insert the dipstick back into the pipe.
Step 6: Pull the dipstick out again and look at the film of oil at the end of the stick. Note how high the oil film reaches on the dipstick and the condition of the oil itself.
If the oil condition is good and you just need to fill the oil to the level indicated on the dipstick, do not attempt to pour the oil into the tiny tube the dipstick sits in, you're just asking for a mess. There should be a screw off cap labeled "Oil Cap" or something along those lines up on top of the largest part of the engine. Unscrew the cap and add oil as needed.
Step 7: Put the dipstick back into the pipe. Congrats! You did it! Remember that oil turns black pretty quickly, but that doesn't affect the quality. Our tip: rub a little between your thumb and index finger, and if it leaves a dirty smudge it needs to be changed.
See how easy that was? If you enjoyed this step-by-step guide on checking your oil and would like us to blog about another service process, let us know in the comments below! If you would like to bring in your vehicle to your Sebewaing Area Used Car Dealer and our certified service center, feel free to stop by or schedule an appointment online! Hank Graff Chevy is located at 3636 Wilder Road, Bay City, MI 48706 and we can help you find the perfect vehicle for your weekend getaway! For more information on Hank Graff Chevrolet, or for any questions call us at (989) 684-4411 or visit our website: www.GraffBayCity.com.


No comments:
Post a Comment